TLDR;
This session is a comprehensive guide to MongoDB database administration with a focus on CRUD operations (Create, Read, Update, Delete) and aggregation. It begins with a recap of previous lessons, including inserting single and multiple documents, and then transitions into more complex operations such as finding documents with specific criteria, updating data, and deleting documents. The session also covers how to use MongoDB Compass, create a cluster, load sample data, and connect the cluster to MongoDB Compass. The latter part of the session is dedicated to aggregation, explaining how it improves query performance and allows for data processing, including creating, removing, and adding fields.
- Covers CRUD operations (Create, Read, Update, Delete) in MongoDB.
- Explains how to use MongoDB Compass and connect to a cluster.
- Details aggregation, including stages like match, project, group, sort, limit, and skip.
Introduction and Recap [38:00]
The session starts with a welcome message and a brief overview of the topics to be covered, which include front-end development with React and MongoDB database administration. It is mentioned that this is the final session of the series. The instructor then recaps what was discussed in the previous class, focusing on insert operations such as insert one and insert many.
MongoDB Compass Setup [49:41]
The presenter guides viewers on how to download and set up MongoDB Compass, a GUI for managing MongoDB databases. To download it, one needs to search for "MongoDB Compass" in Chrome and click on the download link. After downloading, users can open MongoDB Compass and connect to their database by providing a name and color for the connection, then clicking "Save and Connect." Once connected, users will see admin, local, and config databases. The shell option allows users to execute commands. The presenter explains how to switch between databases using the use command, and how to display all databases with show DBs. To see collections within a database, the show collections command is used.
Find Operations and Projection [55:58]
The session covers the find operation, including find one and find. The find method returns multiple documents, while find one returns only the first document. Projection is introduced as a way to specify which fields to return in the query results. For example, to return only the student ID and name, you can use db.collectionName.find({}, {studentID: 1, name: 1, _id: 0}), where _id: 0 removes the default ID field from the results.
Operators in Find: AND and OR [1:06:49]
The presenter explains how to use operators such as AND and OR in find queries. For an AND query, multiple conditions are specified within the same document. For example, to find students whose age is greater than or equal to 22 and have a grade of B, the query would be db.students.find({age: {$gte: 22}, grade: "B"}). For an OR query, the $or operator is used with an array of conditions. For example, to find students whose age is greater than or equal to 22 or who have a grade of C, the query would be db.students.find({$or: [{age: {$gte: 22}}, {grade: "C"}]}). Projection can also be used with these operators to specify which fields to display.
Update Operations: Update One and Update Many [1:16:18]
The session transitions to update operations, starting with updateOne. This method updates a single document that matches the specified filter. The syntax is db.collectionName.updateOne({filter}, {$set: {updates}}). For example, to change the grade of a student named "if" to "C", the query would be db.students.updateOne({name: "if"}, {$set: {grade: "C"}}). The result indicates the number of documents matched and modified. The updateMany method updates multiple documents that match the filter. For example, to change the grade of all students whose age is greater than or equal to 22 to "A", the query would be db.students.updateMany({age: {$gte: 22}}, {$set: {grade: "A"}}).
Delete Operations: Delete One and Delete Many [1:29:10]
The presenter discusses delete operations, including deleteOne and deleteMany. The deleteOne method deletes a single document that matches the specified filter. For example, to delete a document with the name "if", the query would be db.students.deleteOne({name: "if"}). The deleteMany method deletes all documents that match the filter. For example, to delete all documents where the age is greater than or equal to 22, the query would be db.students.deleteMany({age: {$gte: 22}}). An empty filter in deleteMany will delete all documents in the collection.
CRUD Operations Explained [1:35:16]
The instructor summarizes the CRUD operations in MongoDB: Create, Read, Update, and Delete. Create involves inserting new data using insertOne and insertMany. Read involves reading data using find and findOne. Update involves modifying data using updateOne and updateMany. Delete involves removing data using deleteOne and deleteMany.
Introduction to Aggregation [1:37:25]
Aggregation in MongoDB is introduced as a pipeline of stages to process data, improving query performance. It is primarily used for read operations, allowing for data transformation, creation, removal, and addition of fields. Aggregation is used to process data, while indexes are used to improve query performance.
Setting Up MongoDB Atlas and Loading Sample Data [1:41:36]
The presenter guides viewers on how to create a cluster in MongoDB Atlas, a cloud database service. The steps include creating a free cluster, selecting the M0 tier, and creating a database user. It is also shown how to add an IP address to the network access list to allow connections from anywhere. The presenter explains how to connect the Atlas cluster to MongoDB Compass by copying the connection string, pasting it into Compass, entering the password, and saving the connection. The process of loading sample data into the cluster is also demonstrated.
Aggregation: Match Stage [1:53:52]
The session covers aggregation, starting with the match stage. The match stage is used to filter documents based on specified criteria, similar to the find query. For example, to find all sales in the store location "Denver", the query would be db.sales.aggregate([{$match: {storeLocation: "Denver"}}]). The countDocuments method is used to count the number of documents that match the criteria.
Aggregation: Project Stage [2:02:56]
The project stage in aggregation is similar to projection in find queries, allowing you to specify which fields to include or exclude in the output. For example, to display only the purchase method field, the query would be db.sales.aggregate([{$match: {purchaseMethod: "Online"}}, {$project: {purchaseMethod: 1, _id: 0}}]). The toArray() method is used to return all documents at once, instead of a cursor.
Aggregation: Group Stage [2:12:14]
The group stage is used to group documents based on a specified field and perform calculations on the grouped data. For example, to find the number of sales in each store location, the query would be db.sales.aggregate([{$group: {_id: "$storeLocation", totalSales: {$sum: 1}}}]). This groups the documents by store location and calculates the total sales for each location.
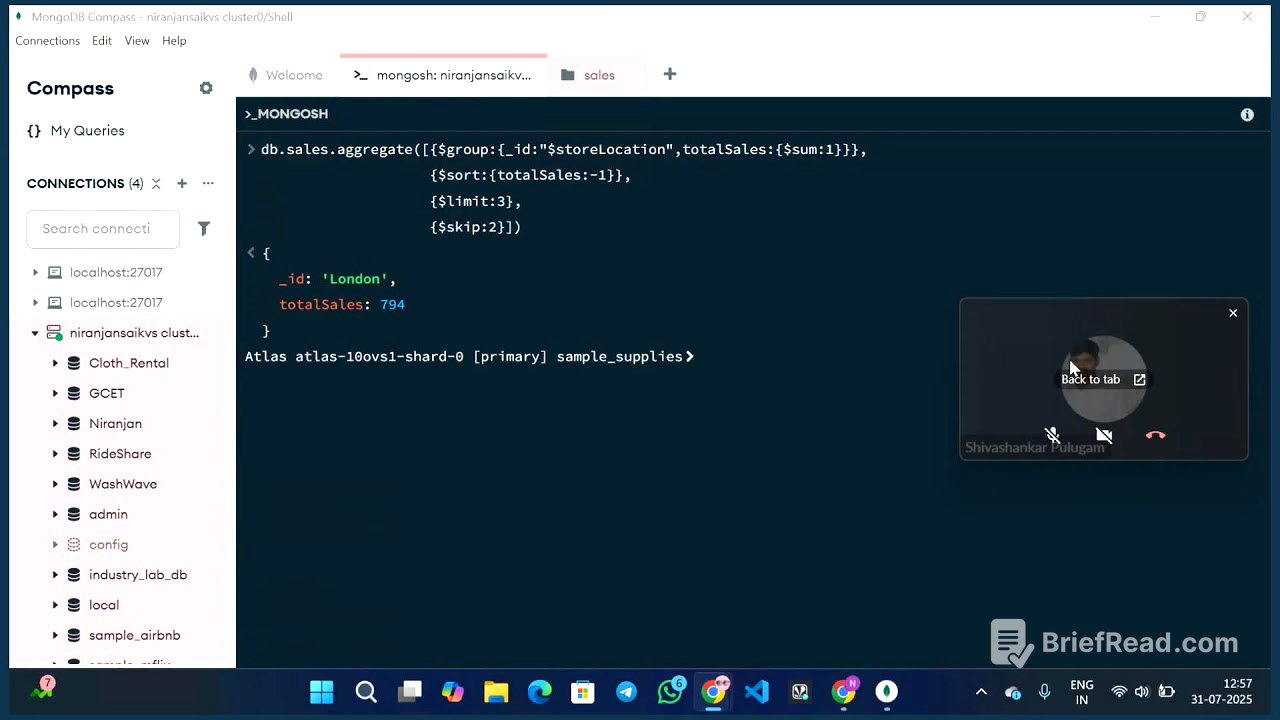
Aggregation: Sort, Limit, and Skip Stages [2:21:06]
The session covers additional aggregation stages: sort, limit, and skip. The sort stage is used to sort the documents based on a specified field. For example, to sort the store locations by total sales in descending order, the query would be db.sales.aggregate([{$group: {_id: "$storeLocation", totalSales: {$sum: 1}}}, {$sort: {totalSales: -1}}]). The limit stage is used to limit the number of documents returned. For example, to get the top three store locations by sales, the query would be db.sales.aggregate([{$group: {_id: "$storeLocation", totalSales: {$sum: 1}}}, {$sort: {totalSales: -1}}, {$limit: 3}]). The skip stage is used to skip a specified number of documents. For example, to find the third highest store location by sales, the query would be db.sales.aggregate([{$group: {_id: "$storeLocation", totalSales: {$sum: 1}}}, {$sort: {totalSales: -1}}, {$limit: 3}, {$skip: 2}]).
Q&A and Conclusion [2:28:17]
The presenter opens the floor for questions and answers, encouraging students to post their doubts in the live chat. The session concludes with a thank you message and a recap of the topics covered.