TLDR;
This YouTube video series, "Sonar for Dummies," aims to educate beginners on how to effectively use fish finders. The series covers understanding sonar colors, how transducers work, interpreting fish returns (arches vs. worms), identifying bait schools and thermoclines, using side scan, and pinpointing fish locations.
- Understanding sonar colors and their intensity.
- How transducers work and interpret returns.
- Identifying fish returns, bait schools, and thermoclines.
- Using side scan for locating fish.
- Pinpointing fish locations after they leave the A-scope.
Sonar Basics: Colors, Returns, and Transducers [0:12]
The video begins by explaining the advantage of color fish finders over monochrome displays, highlighting that color indicates the intensity of returns. A "return" is anything visible on the screen, with the display showing a history of what the transducer has passed over, with yellow indicating the strongest returns (hard objects, large fish) and blue the weakest. The A-scope, a real-time display of what's directly under the transducer, is also introduced. The surface clutter, often seen as yellow at the top, is caused by surface disturbances and debris.
The bottom of the screen displays a hard yellow bar, representing the lake or ocean floor. The narrator explains how sonar works: a transducer sends a signal downward, which bounces back upon hitting an object. Stronger returns (yellow) indicate larger objects or fish in the center of the transducer's cone, while weaker returns (blue, white) suggest smaller objects or those at the cone's edge. The cone widens with depth, meaning deeper water allows for more returns.
Interpreting Bait Schools, Arches, and Thermoclines [9:23]
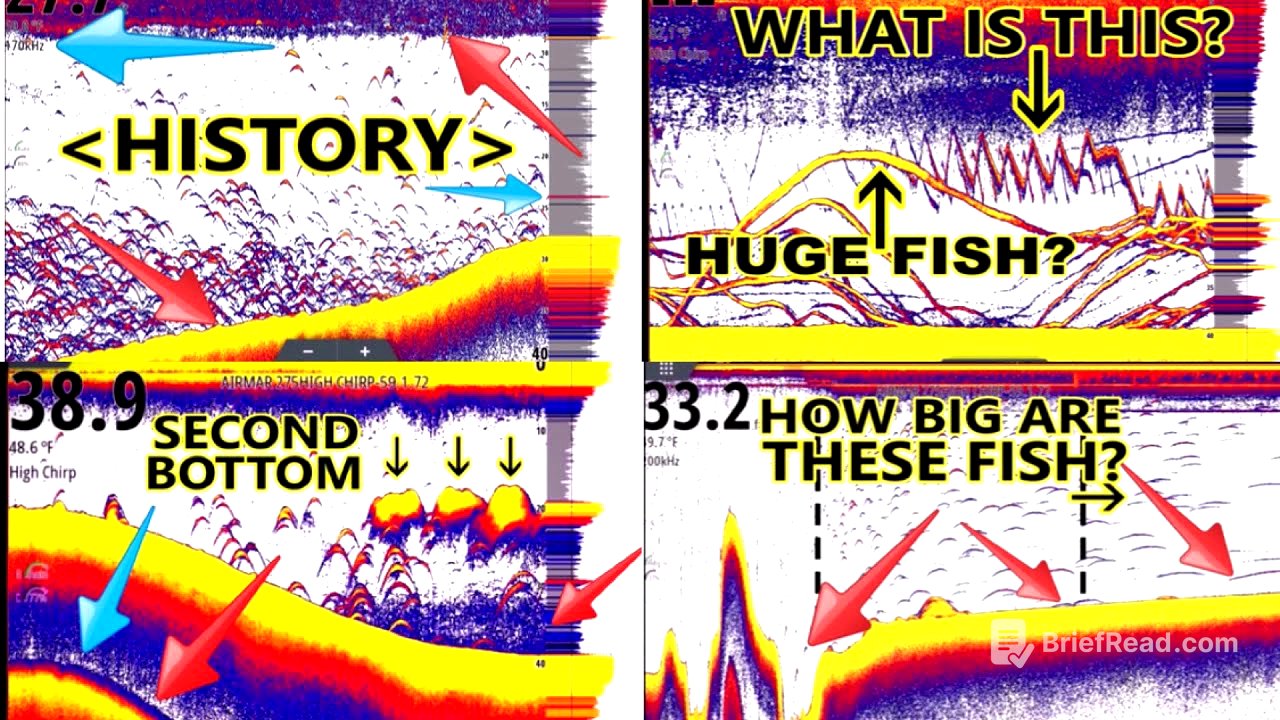
The video explains how to interpret bait schools on a fish finder, noting that dense, bright yellow clouds usually indicate tiny bait, like threadfin shad. A smooth top edge typically signifies a school of bait, while a rough top suggests a tree or bush. Arches indicate fish feeding on the bait. Symmetrical arches mean the transducer is properly aligned.
Stumps or rocks appear as hard returns connected to the bottom with a rough top edge. Fish arches near the bottom show separation from the bottom. A blue haze indicates a thermocline, a layer of colder, denser water that can trick the transducer. Fishing in or below a thermocline is not recommended due to low dissolved oxygen. A second bottom display can help determine bottom density, with a far second bottom indicating a soft bottom and a close one indicating a hard, rocky bottom.
Understanding Fish Returns at Different Speeds [15:53]
The video discusses how speed affects the appearance of fish returns on sonar. At high speeds (40 mph), fish appear as small dots because the transducer only captures one ping per fish. As the boat slows to 10-15 mph, fish appear as arches because the transducer captures multiple pings as it passes over them. At very slow speeds, fish appear as long worms because they remain within the transducer's pulse for an extended period.
The narrator emphasizes that even larger fish may appear as dots at high speeds and that anglers should adjust their expectations accordingly. Understanding these differences is crucial for accurately interpreting sonar data while running on plane, trolling, drifting, or anchored.
Jigging Techniques and Sonar Interpretation [21:54]
The video uses a screenshot to illustrate how fish behavior and jigging techniques appear on sonar. A long worm-like return indicates a fish lingering under the transducer, absorbing multiple pings. The color intensity within the return signifies the strength of the signal, with yellow indicating a stronger return when the fish is in the center of the cone.
Zigzagging lines represent jigs being worked up and down, with the history showing the movement of both the jigs and the fish. The narrator points out how fish can be seen following the jig, indicating interest even if they don't strike. The video also shows a thick haze near the surface, caused by pollen washed into the water.
Pinpointing Fish with Sonar and Side Scan Techniques [31:18]
The video explains how to pinpoint fish marked on sonar, particularly in deeper water where the transducer cone is wider. Horizontal lines on the screen represent the lead lines of live herring rigs, with thinner blue lines indicating the herring themselves. Arches that zigzag up and down suggest active fish responding to the bait.
The video includes footage of anglers using sonar to target specific fish, with one angler dropping his bait multiple times based on the sonar readings until he hooks a fish. The importance of side scan is highlighted, showing how it can reveal fish locations away from the boat, leading to successful casts.
Tracking Fish Movement and Sonar Interpretation [42:25]
The video addresses a common question: where is the fish after it leaves the A-scope? The narrator explains that anything in the history is just a picture of what was passed over, not necessarily where the fish currently is. The A-scope shows what is directly under the boat in real-time.
To track fish, the narrator suggests touching the screen on the desired mark to see its distance. While the fish may have moved, this provides a guesstimation of its location. The video also demonstrates how to set waypoints on fish marks for future reference.