TLDR;
This video provides a step-by-step guide on creating a WhatsApp bot using n8n, focusing on establishing a basic connection for testing purposes. It covers setting up a Facebook Business account, creating an app, obtaining necessary IDs and tokens, and integrating the bot with AI models and memory for contextual responses. The tutorial also addresses common issues encountered during the setup and demonstrates how to resolve them to achieve a functional WhatsApp bot.
- Setting up a Facebook Business account and creating an app for WhatsApp integration.
- Connecting the WhatsApp bot to AI models and memory for contextual responses.
- Troubleshooting common issues during the setup process.
Introduction to WhatsApp Bot Creation [0:00]
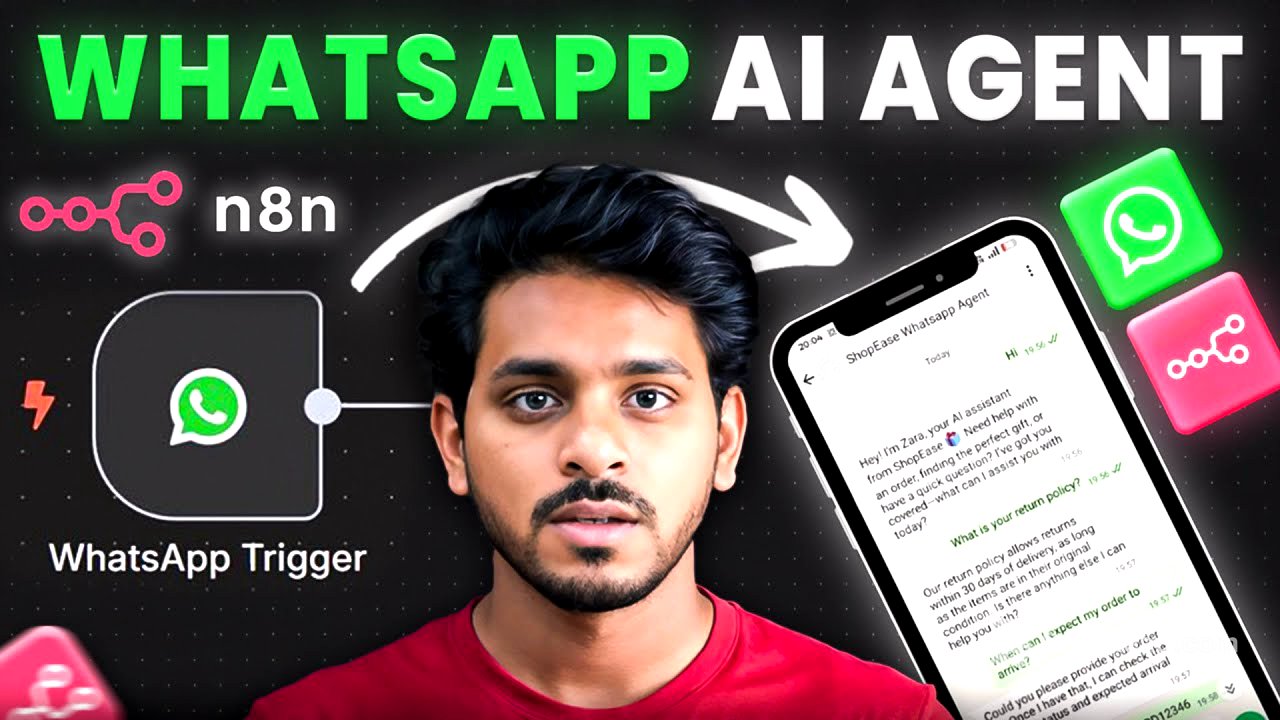
The video introduces the creation of a WhatsApp bot, acknowledging the challenges involved, particularly with Meta permissions. The initial focus is on creating a simple, interactive bot for testing, with plans to cover business number integration and agent matching in future videos. The video aims to demonstrate the basic connection process for creating a WhatsApp bot.
Setting Up WhatsApp Business Cloud in n8n [0:44]
The tutorial begins by creating a new workflow in n8n named "WhatsApp Bot." The first step involves using the WhatsApp Business Cloud to trigger actions when a message is received. The presenter emphasizes the importance of having a Facebook account, as WhatsApp is integrated through Meta.
Creating a New App in Facebook Business [1:21]
To obtain the necessary Client ID and Client Secret, the video guides viewers through creating a new app in their Facebook Business account. This involves navigating to business.facebook.com/settings, selecting or creating a business account, and adding a new app. The app creation process includes specifying the app's name (e.g., N8 NAI agent), contact email, and use case (selecting "Others").
Setting Up WhatsApp in the New App [3:51]
After the app is created, the tutorial demonstrates how to set up WhatsApp integration within the app settings. This involves finding the WhatsApp option and setting it up, which may take some time due to Facebook's processing. Once set up, the viewer is directed to the app settings to find the Client ID and Client Secret.
Connecting Credentials in n8n [4:31]
The Client ID and Client Secret obtained from the Facebook app settings are then used to create new credentials in n8n. These credentials allow n8n to connect to the WhatsApp Business Cloud. After successfully connecting the credentials, the WhatsApp trigger is activated and renamed to "CHAT RECEIVED."
Adding AI Agent and Memory [5:22]
The next step involves adding an AI agent to the workflow, selecting a chat model (e.g., OpenAI), and connecting it to the account. Additionally, simple memory is added to the workflow to provide context to the bot's responses.
Configuring the Send Message Action [6:08]
The tutorial explains how to configure the "Send Message" action in n8n, which is triggered after receiving a chat message and processing it through the AI agent. This requires creating new credentials using an Access Token and Business Account ID, which are found in the API settings of the Facebook app.
Obtaining Access Token and Business Account ID [6:41]
The video details how to obtain the Access Token and Business Account ID from the WhatsApp API settings in the Facebook app. It includes adding a test number, generating the Access Token, and copying both the token and the Business Account ID to n8n.
Finalizing the Connection and Sending Messages [8:31]
With the Access Token and Business Account ID, the connection is finalized in n8n. The tutorial then explains how to add the test number as a contact in WhatsApp and execute the workflow to send a test message. Initial attempts may fail due to issues with the AI agent and session ID, which are addressed in the following steps.
Troubleshooting and Correcting Errors [9:21]
The video addresses common errors encountered during the setup, such as issues with the AI agent's user message and the simple memory's ID. It provides solutions, including entering the message input in the AI agent settings and using a manual ID for the simple memory. The presenter also emphasizes the importance of matching spellings in the workflow.
Addressing Country Code and Output Issues [11:05]
Further troubleshooting involves adding the country code to the recipient phone number and correcting the message text to display the AI agent's output. The tutorial demonstrates how to drag and drop the AI agent's message into the text body to ensure the bot's responses are displayed correctly.
Activating the WhatsApp Bot and Testing [11:52]
After resolving the errors, the WhatsApp bot is activated, and the presenter demonstrates a live chat with the bot. The bot's ability to provide contextual responses, thanks to the added memory, is highlighted. The video concludes by emphasizing that this is a basic connection setup, with more detailed discussions on client projects and pricing to follow in future videos.