TLDR;
This tutorial guides absolute beginners through crocheting a customisable drawstring pouch. It covers everything from making a slip knot and foundation chain to creating double crochet stitches and finishing the pouch with a crocheted strap. The tutorial emphasises customisation, encouraging viewers to adjust the pouch's width and height to their preferences.
- Creating a slip knot and foundation chain.
- Mastering the double crochet stitch.
- Adding a drawstring strap.
Must Watch Before Starting [0:00]
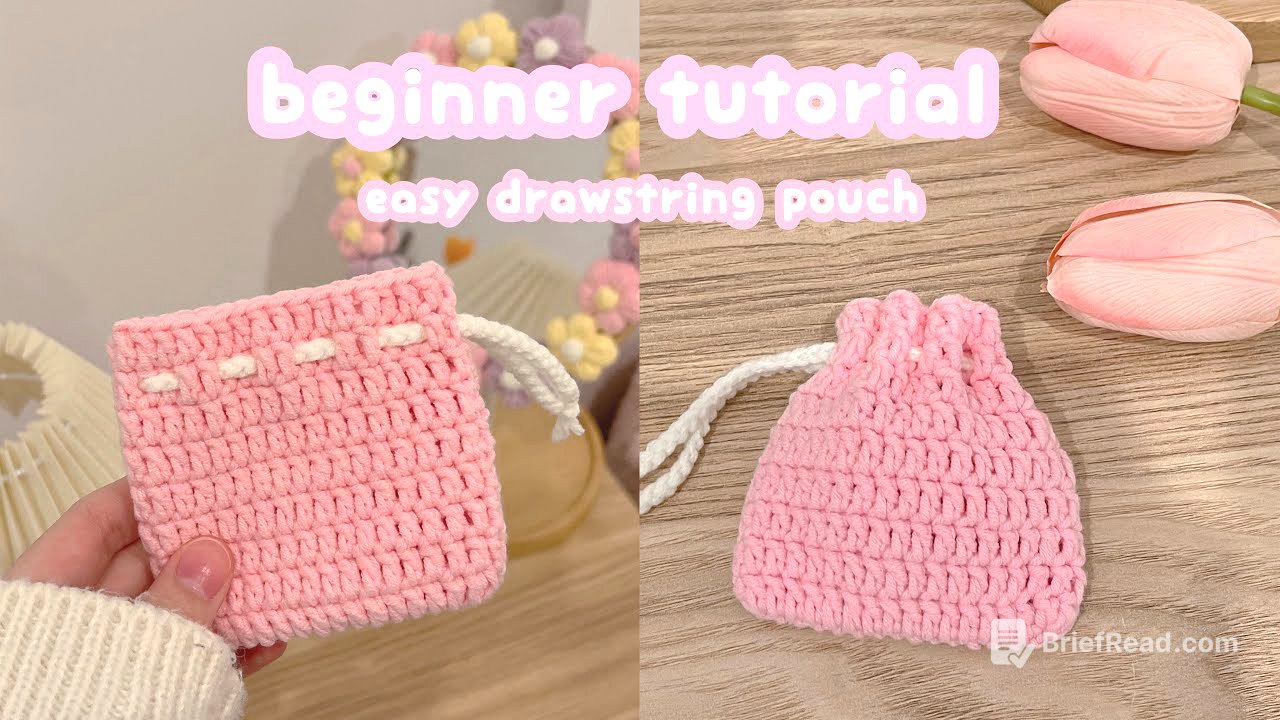
The video introduces a beginner-friendly crochet project: a drawstring pouch, ideal for storing items like earphones, lip gloss or keys. The pouch is fully customisable in width and height. The tutorial aims to guide beginners through each step, from starting the project to completing all the necessary stitches. It encourages beginners not to be discouraged by initial challenges, highlighting that practice improves technique. The video also introduces Universe, a beginner-friendly platform for creating a website to showcase or sell crochet creations.
Slip Knot (Round 1) [2:58]
The tutorial begins with creating a slip knot. The yarn's tail is held in the right hand, while the left hand points two fingers upwards. The yarn is wrapped around these fingers once, then twisted to form a loop on the left. The end of the yarn is pulled through this loop, creating a knot. The knot's size can be adjusted by pulling the tail. A crochet hook is inserted into the loop to ensure it fits, adjusting the loop until it slides smoothly on the hook.
How to Hold Your Yarn and Hook (Round 1) [4:46]
The demonstrator explains how to hold the yarn and hook. The working yarn is wrapped around three fingers once, going behind and under to create a loop. It then goes behind the index finger. The ring finger and pinky hold the yarn in place. The middle finger and thumb hold the piece, while the index finger points upwards. The hook is held in a writing grip.
How to Make Foundation Chain (Round 1) [5:33]
The tutorial explains how to create the foundation chain, which determines the pouch's width. More chains create a wider pouch, while fewer chains result in a narrower one. To chain, the yarn is brought over the hook (yarn over) and pulled through the loop on the hook, forming a 'V', which equals one chain. This process is repeated to create the desired number of chains. The demonstrator makes 21 chains for a small pouch, but the number can vary based on personal preference.
How to Make Double Crochet (Round 1) [11:02]
The tutorial transitions to starting round one with double crochet stitches. Two extra chains are added to provide height for the double crochet, but these do not count towards the foundation chain. The first double crochet is made into the third chain from the hook. To make a double crochet, yarn over, insert the hook into the designated chain, yarn over again, and pull the yarn through the chain, resulting in three loops on the hook. Yarn over and pull through the first two loops, then yarn over again and pull through the remaining two loops. A stitch marker is placed in the first stitch to mark it.
Double Crochet on the Other Side [22:30]
The tutorial explains how to work double crochet stitches on the opposite side of the foundation chain. After completing the first side, three double crochet stitches are placed in the very last stitch to allow turning the work. The demonstrator then works along the bottom of the foundation chain, placing a double crochet stitch in each corresponding stitch from the top. The tail of the yarn is caught on the hook to hide it.
Slip Stitch (Round 1) [28:35]
The tutorial explains how to complete round one by connecting the last stitch to the first with a slip stitch. The hook is inserted into the first stitch, marked by a stitch marker. Yarn over, pull the yarn through the stitch, then pull it through the loop on the hook. The loop is tightened to avoid mistaking it for a stitch in the next round.
Round 2 [30:20]
The tutorial moves onto starting round two, beginning by chaining two to provide height for the double crochet stitch. The demonstrator explains that from this point forward, stitches will be made on top of the stitches from the previous round. To do this, the hook is inserted under the 'V' at the top of each stitch from the previous round. A double crochet stitch is then made as before. The first stitch of the round is marked with a stitch marker.
Round 3 [37:39]
The tutorial explains how to begin round three, which is essentially a repeat of round two. Chain two to start, then make a double crochet in each stitch from the previous round, inserting the hook under the 'V' of each stitch. Mark the first stitch with a stitch marker.
Round 3 & Onwards [40:44]
The tutorial clarifies that the rest of the pouch is made by repeating round two or three until the desired length is achieved. Viewers can customise the pouch's depth by adding more or fewer rows.
Last Round [41:55]
The tutorial details how to finish the pouch. After completing the desired number of rounds, the last stitch is connected to the first with a slip stitch. The yarn is then fastened off by chaining one and cutting the yarn, leaving a tail.
How to Crochet Strap for Drawstring Pouch [42:30]
The tutorial guides viewers through creating the drawstring strap using a different colour yarn. The process involves making a series of chains, similar to the foundation chain. The length of the chain should be sufficient to wrap around the pouch with some excess for pulling. The demonstrator recommends rewatching the beginning of the video for a more in-depth explanation of the foundation chain technique. Once the desired length is achieved, the yarn is fastened off. The tail is then threaded through a darning needle and woven through the stitches of the pouch, going under two stitches, then over two stitches, all the way around.
Weave In [48:01]
The tutorial concludes by securing the drawstring and hiding the yarn tails. A knot is tied at the end of the drawstring to prevent it from slipping out. The yarn tail is then threaded through a darning needle and woven into the inside of the pouch to hide it, picking up random loops from the inside without showing on the outside. The excess yarn is then cut off.