TLDR;
This video provides a comprehensive guide on creating a t-shirt pattern, grading it for multiple sizes, and creating a marker for efficient fabric cutting using Optitex 15 software. It covers setting up the software, creating basic patterns, grading for different sizes, and using the marker module to optimize fabric usage.
- Setting up Optitex 15 and ensuring correct measurement units.
- Creating a basic t-shirt pattern for size L.
- Grading the pattern for sizes S, M, XL, and XXL.
- Using the marker module to efficiently arrange pattern pieces for cutting.
Introduction to T-Shirt Pattern Making, Grading, and Marker Creation [0:00]
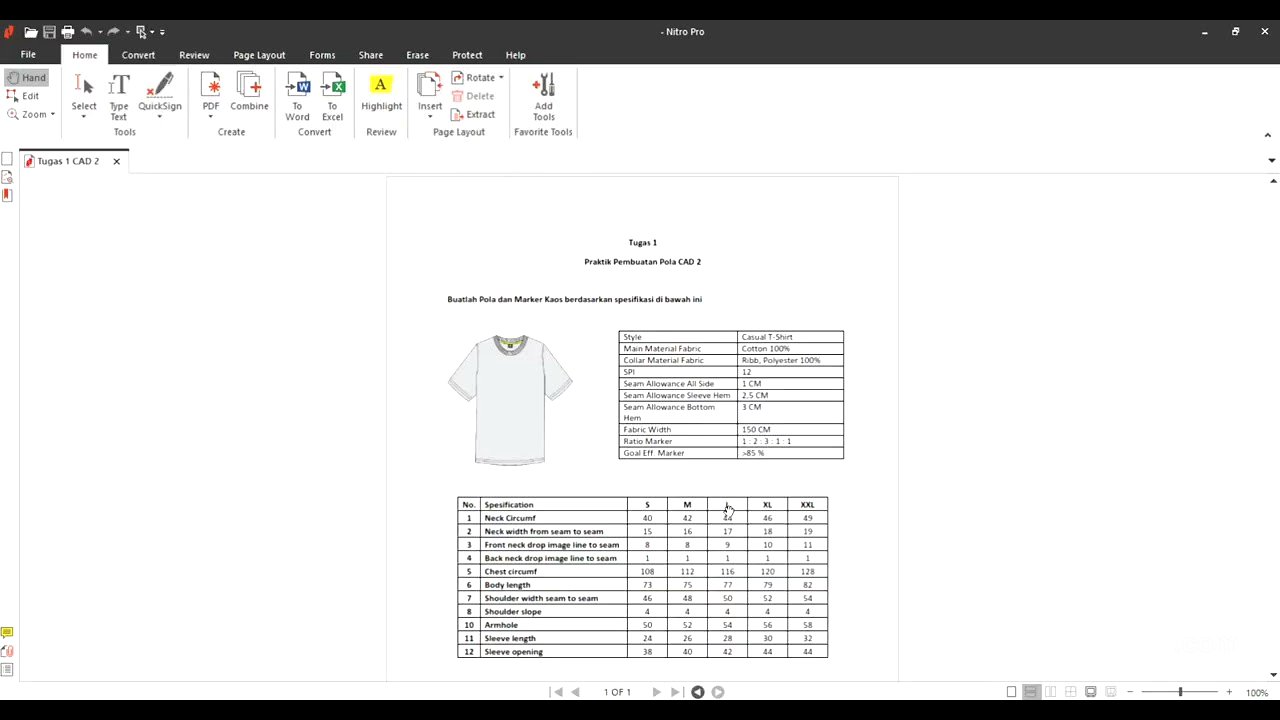
The video introduces the process of creating a t-shirt pattern, grading it for multiple sizes, and making a marker for cutting. The example used is a casual t-shirt made from 100% cotton with RIP material for the collar and specific stitch and seam allowances. The fabric width is 150 cm, and the marker ratio for sizes S, M, L, XL, and XXL is 1:2:3:1:1, with a target efficiency of over 85%. The tutorial focuses on creating a size L pattern and grading it to other sizes using Optitex 15 software.
Setting Up Optitex 15 for Pattern Making [2:50]
The video demonstrates how to set up Optitex 15 for pattern making, focusing on PDS 15, which is used for creating and grading patterns. The first step is to ensure the units of measurement are correct by navigating to the tools menu, selecting preferences, and choosing centimeters as the working unit with a tolerance of 0.01 for accuracy. This setup ensures that all measurements used in the pattern-making process align with the specifications.
Creating the Basic Body Pattern [5:28]
The process of creating a basic body pattern for a size L t-shirt is explained. The initial shape is a rectangle, with dimensions based on the body circumference and length. For size L, the body circumference is 116 cm, so the width of the pattern piece is 116/4 = 29 cm (since only 1/4 of the pattern is created for mirroring). The length is 77 cm. The video details how to create a rectangular piece in Optitex, inputting the length and width, and adjusting the display for easier pattern making.
Designing the Neckline [12:06]
The video explains how to design the front and back necklines. The neck circumference is 44 cm, so half of it is 22 cm. The distance from the center to the shoulder is 17 cm, so half of that is 8.5 cm. Points are created on the shoulder line to mark these distances. Lines are then drawn to create the neckline curves, with the back neckline curved using a guide line to prevent a W-shape. The front neckline is adjusted to ensure the total neckline length is 22 cm.
Creating Shoulder Line and Armholes [26:08]
The process of creating the shoulder line and armholes is detailed. The shoulder drop is 4 cm, so a point is created 4 cm below the shoulder point. A line is then drawn from the neckline to this point to form the shoulder line. For the armhole, the formula of 1/4 body circumference plus 1-2 cm is used. The armhole is then curved to a length of 27 cm, adjusting points and lines to achieve the desired shape.
Separating Front and Back Body Patterns and Adding Seam Allowances [35:07]
The video explains how to separate the front and back body patterns using the "build piece" tool (shortcut B). The front body is mirrored, and both front and back pieces are identified with appropriate names and materials. Seam allowances are added using the basic seam tool (1 cm on all sides) and the add seam tool (3 cm at the bottom hem).
Creating the Sleeve Pattern [45:28]
The process of creating the sleeve pattern is detailed. A rectangle is created with the length and width of the sleeve. The length is 28 cm, and the width is half the armhole circumference (27 cm). A point is marked 12 cm from the top to determine the peak height. The sleeve opening is 42 cm, so a point is marked at 21 cm. The sleeve is then shaped by curving the lines and adding a seam allowance of 1 cm, with 2.5 cm at the bottom.
Grading the T-Shirt Pattern [53:15]
The video explains the grading process to create different sizes (S, M, XL, XXL) from the base size L. A size table is created, and the X and Y axes are considered for each grading point. The sleeve length is graded by 2 cm per size, with adjustments made at the top and bottom points. The armhole and body circumference are also graded, ensuring each size meets the specified measurements.
Grading Sleeve Length and Armhole [58:59]
The video details the grading process for the sleeve length and armhole. The sleeve length is graded by adjusting the Y-axis, with -1 cm for smaller sizes (M, S) and +1 cm for larger sizes (XL, XXL) at each point. The armhole is graded by adjusting the X-axis, with -0.58 cm for smaller sizes and +0.58 cm for larger sizes, ensuring the armhole circumference increases by 2 cm per size.
Grading Neckline, Shoulder, and Body Circumference [1:17:55]
The video explains how to grade the neckline, shoulder, and body circumference. The front neck drop is graded based on specifications, with adjustments to the Y-axis. The neck width is graded by adjusting the X-axis, with -0.25 cm for smaller sizes and +0.25 cm for larger sizes. The shoulder is graded by adjusting the X-axis, with -0.5 cm for smaller sizes and +0.5 cm for larger sizes. The body circumference is graded by adjusting the X-axis, with -1 cm for smaller sizes and +1 cm for larger sizes, except for XXL, which is +2 cm.
Finalizing Grading and Preparing for Marker Creation [1:26:17]
The video details the final steps in the grading process, including checking and adjusting the armhole and neckline measurements to ensure they meet the specified differences. Adjustments are made to the Y-axis for the armhole and X-axis for the neckline to achieve the correct grading. Once the grading is complete and verified, the pattern is saved, and preparations are made for creating a marker.
Creating a Marker for Fabric Cutting [1:45:41]
The video explains how to create a marker for fabric cutting using the marker module in Optitex 15. The marker definition is set up with the fabric width (148 cm after adjustments) and table length (1000 cm). The PDS file is opened, and the necessary components (front body, back body, and sleeves) are added. The marker ratio (1:2:3:1:1 for S, M, L, XL, XXL) is input, and the pattern pieces are arranged on the marker sheet.
Optimizing Marker Efficiency and Saving the Marker File [1:52:59]
The video demonstrates how to optimize marker efficiency using automatic nesting. The auto nesting function is set up for 1 minute to allow the marker application to arrange the pattern pieces efficiently. The efficiency achieved is 75.02%, with a length of 8.22 meters. The marker file is then saved in MRK format.