TLDR;
This video provides a step-by-step guide on how to perform ABO and Rh blood grouping using a diagnostic kit with monoclonal antibodies. It covers the necessary materials, the procedure for collecting and testing blood samples, and how to interpret the results based on agglutination patterns.
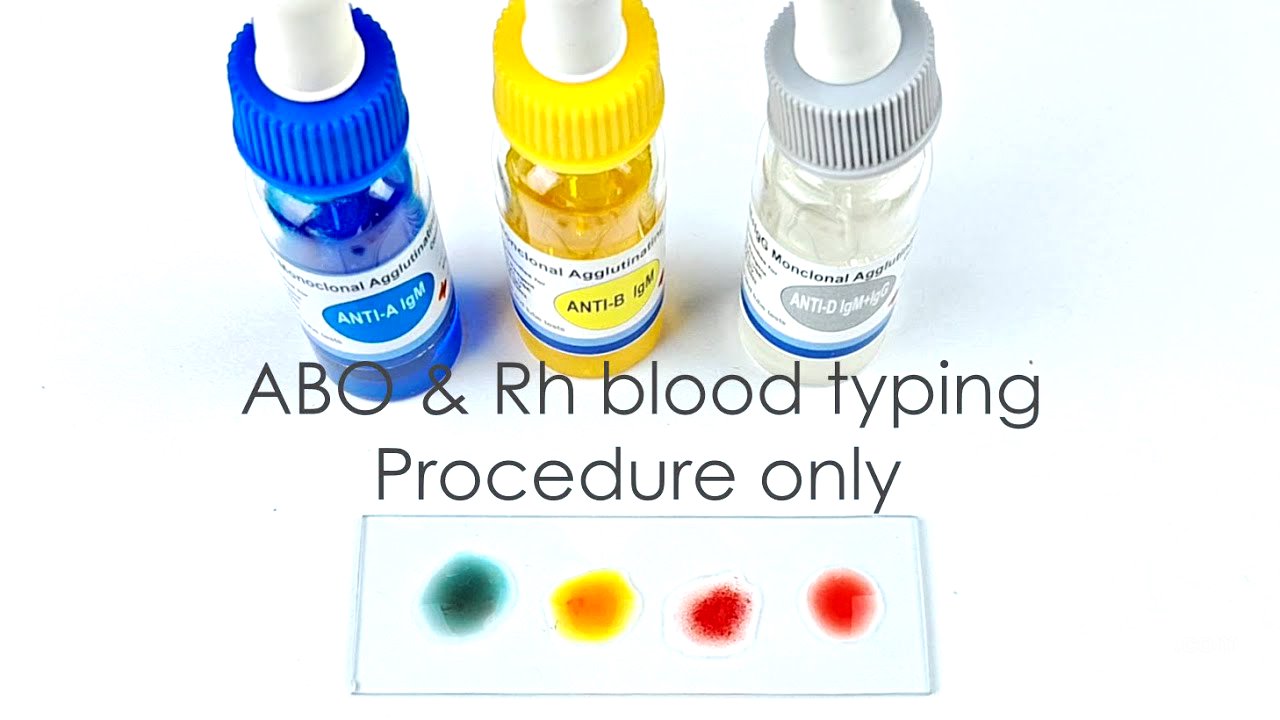
- The kit includes colored reagents: blue for anti-A, yellow for anti-B, and colorless for anti-D.
- Proper mixing and observation of agglutination are crucial for accurate blood group determination.
- A negative control with normal saline is used to ensure the validity of the test.
Introduction to ABO and Rh Blood Grouping [0:14]
In a diagnostic lab, ABO and Rh blood grouping is performed using a diagnostic kit containing monoclonal antibodies for A, B, and Rh antigens. The kit includes anti-A antibodies (blue), anti-B antibodies (yellow), and anti-RhD antibodies (colorless). These color codes are universal standards.
Materials Needed for the Test [0:55]
To perform the ABO and Rh blood grouping test, you need a clean glass slide or white porcelain tile, a pricking device (lancet or pricking pen), alcohol swabs, toothpicks or capillary tubes, and the blood grouping test kit with anti-A, anti-B, and anti-D antibody vials.
Step-by-Step Procedure [1:22]
First, remove the blood grouping test kit from the refrigerator and homogenize the contents of the antibody vials by inverting each bottle three to five times, then allow them to reach room temperature. Place the pre-cleaned glass slide on a white sheet of paper or porcelain tile. Sterilize the tip of the middle or ring finger with an alcohol swab, let it dry, and prick the finger using the lancet or pricking pen, ensuring a new lancet is used for each person. Place four drops of blood on the glass slide at equal distances, avoiding the edges. Add one drop each of anti-A, anti-B, and anti-D reagents to the first, second, and third drops of blood, respectively. Add a drop of normal saline to the fourth blood drop as a negative control.
Mixing and Observation [2:50]
After adding the antisera and normal saline, quickly and thoroughly mix the four blood drops individually using separate toothpicks or match sticks. Leave the slide undisturbed for 30 seconds to a couple of minutes, then check for agglutination (clumping) of red blood cells in the four mixture drops. The negative control should not show clumping; if it does, the experiment must be repeated.
Interpreting the Results [3:38]
The blood group is determined by which of the three drops on the slide exhibit RBC clumping. In the example provided, agglutination is seen only in the third blood drop, which is mixed with the anti-D antibody reagent, indicating a blood group O positive.
![How Doctor Who's Missing Episodes Came Back [Part 3]](https://wm-img.halpindev.com/p-briefread_c-10_b-10/urlb/aHR0cDovL2ltZy55b3V0dWJlLmNvbS92aS9FbnBEeUhsT0RtSS9ocWRlZmF1bHQuanBn.jpg)