TLDR;
This video provides a step-by-step guide on building a simple yet powerful AI agent in N8N, a no-code platform. It explains the core components of an AI agent, including understanding goals, planning steps, and utilising tools like ChatGPT and Gmail. The tutorial covers connecting these tools, setting up credentials, and training the agent to perform tasks such as sending emails.
- Explains the concept of AI agents and their components in simple terms.
- Provides a practical, no-code tutorial on building an AI agent in N8N.
- Covers connecting and configuring tools like ChatGPT, Gmail, and Google Sheets.
- Demonstrates how to train the AI agent to perform specific tasks, such as sending emails based on data from Google Sheets.
Introduction to AI Agents [0:00]
The video introduces the concept of AI agents and explains how to build one using N8N, a no-code platform. The AI agent will be capable of planning steps, using tools, and executing tasks. The presenter shares his experience in building AI agents for businesses, including WhatsApp bots, voice agents, and smart CRM systems. The plan includes explaining what an AI agent is, building an N8N workflow, connecting tools like ChatGPT and Gmail, and providing a reusable template and troubleshooting checklist.
Understanding AI Agent Architecture [1:00]
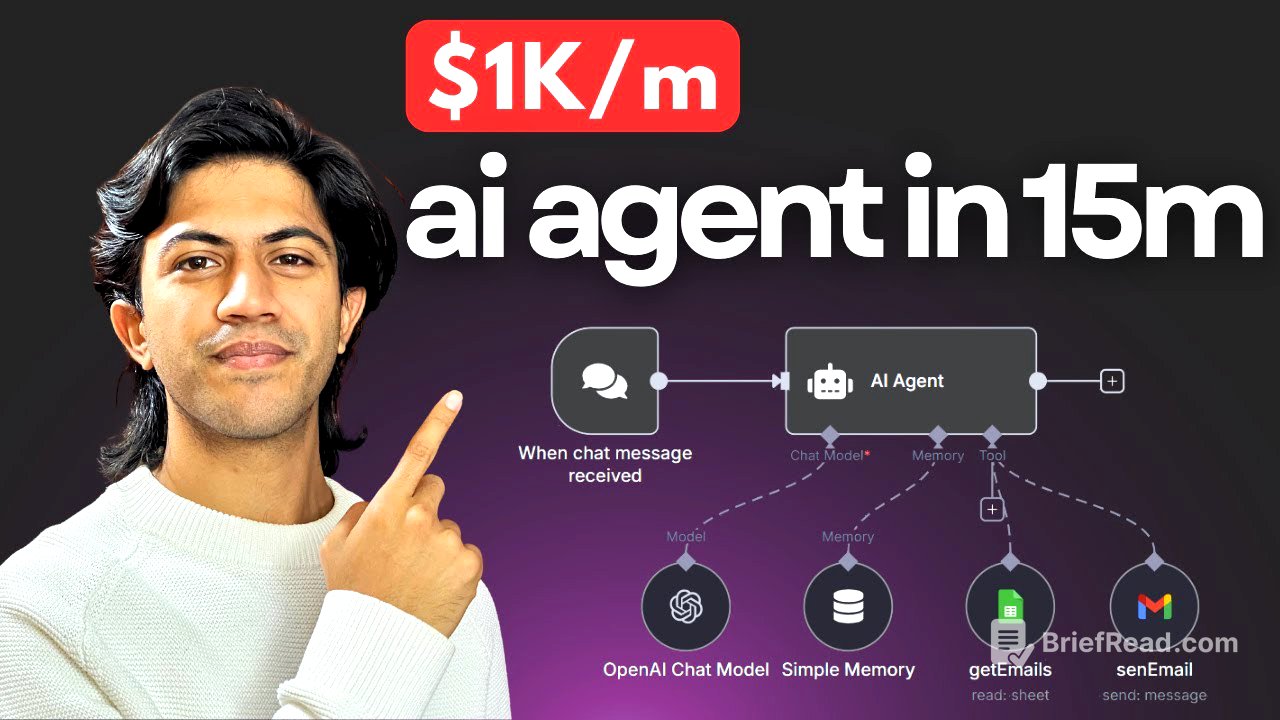
The presenter explains the architecture of an AI agent using a diagram. The process starts with a user goal, which is fed into the AI agent. The AI agent uses its "brain," which is essentially a language model like ChatGPT, to understand the goal. It then uses context to plan the steps needed to achieve the goal and utilises available tools to execute the task. For example, if the goal is to send an email, the AI agent needs access to a tool like Gmail. The context is provided through training, including a system prompt and the actual input.
Building the N8N Workflow [3:27]
The presenter begins building the AI agent workflow in N8N from scratch. The first step is to add a chat trigger, which allows interaction with the workflow through a chat window. Next, an AI agent node is added, which initially has no tools or chat models connected. The presenter then connects an OpenAI chat model, which serves as the "brain" of the AI agent. This requires setting up credentials by obtaining an API key from the OpenAI platform.
Connecting OpenAI and Setting Up Credentials [4:29]
To connect the OpenAI chat model, an API key is required. The presenter guides viewers to the OpenAI platform to create a new secret key. It's important to have a credit balance in the OpenAI account to cover the costs of using the API. The API key is then pasted into the N8N credential settings. After a successful connection is established, the presenter chooses a ChatGPT model.
Adding Memory and Testing the AI Agent [6:21]
The presenter adds a simple memory tool to the AI agent to enable it to remember previous interactions. Without a memory tool, the AI agent cannot recall past conversations. The memory tool is configured with a context window length of five. After adding the memory tool, the AI agent is able to recall and use information from previous interactions.
Connecting Gmail for Email Sending [7:47]
To enable the AI agent to send emails, the presenter connects a Gmail access tool. This involves setting up credentials by obtaining a client ID and client secret from the Google Cloud Console. The presenter navigates to the Google Cloud Console, creates a new project, and configures the OAuth consent screen. The app is named "demo," and the presenter's email address is provided.
Configuring OAuth and Obtaining Credentials [9:21]
The presenter continues configuring the OAuth client ID by selecting "Web application" as the application type and naming it "demo." The OAuth redirect URI is copied from N8N and pasted into the Google Cloud Console. After creating the OAuth client ID, the client ID and client secret are copied and pasted into the N8N Gmail credential settings. A test user is added to the audience to grant access to the Gmail API.
Authorising Access and Completing Gmail Setup [10:48]
The presenter authorises access to the Google account by signing in with the same account used to set up the Google Cloud project. The necessary permissions are granted to the N8N app. The Gmail credential is then renamed to "demo" for easy identification. With the Google Gmail API connected, the presenter explains how to configure the AI agent to automatically determine the recipient, subject, and message of the email.
Configuring Email Parameters and Testing [11:23]
The presenter configures the Gmail tool to allow the AI model to define the recipient, subject, and message parameters automatically. The email type is changed from HTML to text, and the "append N8N attribution" option is deselected to remove the "sent by N8N" footer. The presenter then tests the AI agent by sending an email to a specified address, asking how their day was.
Troubleshooting Gmail API and Enabling Services [13:15]
The presenter encounters an error and realises that the Gmail API needs to be manually enabled in the Google Cloud Console. The Gmail API is enabled, and the email is resent. The email is successfully sent and received, demonstrating the AI agent's ability to send emails on command.
Connecting Google Sheets for Data Access [14:39]
The presenter aims to make the AI agent smarter by connecting a Google Sheets database containing email addresses and positions. The Google Sheets tool is added to the workflow, and the same client ID and client secret from the Gmail setup are used. The presenter signs in with the Google account and grants the necessary permissions.
Enabling Google Sheets and Drive APIs [16:06]
The presenter encounters another error and realises that the Google Sheets API and Google Drive API need to be enabled in the Google Cloud Console. Both APIs are enabled. The presenter selects the "Demo database" Google Sheet and the first sheet within it.
Configuring the AI Agent with System Message [17:37]
The presenter explains the importance of providing context to the AI agent by adding a system message. The system message teaches the AI agent what it is, what tools it has access to, and how to use those tools. The presenter uses a custom GPT to generate a system prompt.
Generating and Implementing the System Prompt [18:51]
The presenter uses a custom GPT to generate a system prompt for the AI agent. The prompt is tailored to the specific tools and tasks the AI agent will be performing. The generated system prompt is copied and pasted into the AI agent's system message settings. The presenter reviews and modifies the system prompt to remove unnecessary steps and ensure the AI agent performs tasks without confirmation.
Testing the Complete AI Agent [21:36]
The presenter tests the complete AI agent by sending an email to their HR manager, instructing the agent to state that they won't be able to make it to work. The AI agent successfully pulls the correct email address from the Google Sheet and sends the email. The email is received with the correct content and subject, demonstrating the AI agent's ability to understand, contextualise, and perform tasks using the connected tools.
Conclusion and Business Applications [22:54]
The presenter concludes by highlighting the potential business applications of such AI agents, such as providing AI-powered assistants to managers for email management. The presenter encourages viewers to subscribe for more videos on complex workflows and AI agents.