TLDR;
This video explains what sharpness is in photography and how to properly sharpen photos in Lightroom Classic or Adobe Camera Raw. It covers the importance of capturing sharp photos in the field, how sharpening works in post-processing, and the use of masking to avoid unwanted noise. The video also discusses when not to sharpen, using third-party software like Topaz for challenging images, and the relationship between texture, clarity, and sharpening. The key takeaways are to understand the impact of sharpening on detail and noise, use masking to target sharpening, and consider the overall need for sharpness in different types of photos.
- Sharpness is the ability to perceive fine detail, influenced by lens quality, resolution, shutter speed, noise, and light.
- Sharpening in post-processing enhances edges by making light areas lighter and dark areas darker, increasing perceived contrast.
- Masking in Lightroom allows you to apply sharpening selectively to the subject, reducing noise in the background.
What is Sharpness? [0:47]
Sharpness is defined as the ability for a viewer to perceive detail at a very fine level, influenced by factors like lens quality, sensor resolution, shutter speed, noise, and light quality. A photo of a common eider taken with high-quality equipment demonstrates natural sharpness due to good lighting that creates ridges and shadows in the feathers, enhancing micro contrast. While a small amount of default sharpening is applied in Lightroom, the image already exhibits significant detail even when cropped.
Why Sharpen Photos? [3:05]
Raw images often require sharpening because cameras may have anti-aliasing filters that soften the image. Sharpening in post-processing involves enhancing the contrast along edges, making the lighter side of an edge lighter and the darker side darker. Using a gradient image, the author shows how the sharpening slider creates white lines on the light gray side and dark gray lines on the darker side, enhancing the perception of sharpness.
How Sharpening Works on Real Photos [4:38]
A photo of a juvenile cheetah is used to demonstrate how sharpening affects real images. While the photo appears sharp out of the camera due to good conditions and equipment, adding sharpening enhances the detail. However, oversharpening can degrade the image quality, making it look pixelated or "crunchy". The key is to stop sharpening at the point where the image starts to break down.
The Masking Tool [5:57]
The masking slider in Lightroom differentiates the subject from the background by highlighting in-focus areas in white and out-of-focus areas in black. By holding Alt (Option on Mac) while adjusting the masking slider, users can selectively sharpen only the areas in white, avoiding the amplification of noise in the background. This technique involves balancing sharpness on the subject with minimal noise in the background.
Radius and Detail Sliders [8:06]
The radius slider determines how far out from an edge the sharpening effect extends, while the detail slider affects the level of detail enhanced. Lightroom automatically adjusts these settings based on the camera's megapixels, so manual adjustments are often unnecessary. The software is designed to estimate the appropriate amounts for radius and detail based on the camera's specifications.
When Not to Sharpen [9:47]
Not all photos need to be super sharp. A photo of a crashing wave is used as an example where excessive sharpness is not required due to the inherent motion and humidity. Similarly, a photo of a dog taken with a mist filter benefits from a soft glow rather than tack sharpness. The author demonstrates how to add a bit of sharpening using the masking trick, focusing on the ends of the crashing waves without needing a lot of sharpness.
Using Topaz for Challenging Images [11:49]
For photos lacking original sharpness, especially after deep cropping, third-party software like Topaz Photo AI can be beneficial. A photo of a peregrine falcon, heavily cropped due to distance, is used to demonstrate Topaz's capabilities. The software automatically enhances sharpness, removes noise, and upscales the image, often with just one click. While Lightroom struggles to sharpen the deeply cropped image without amplifying noise, Topaz provides a cleaner, sharper result.
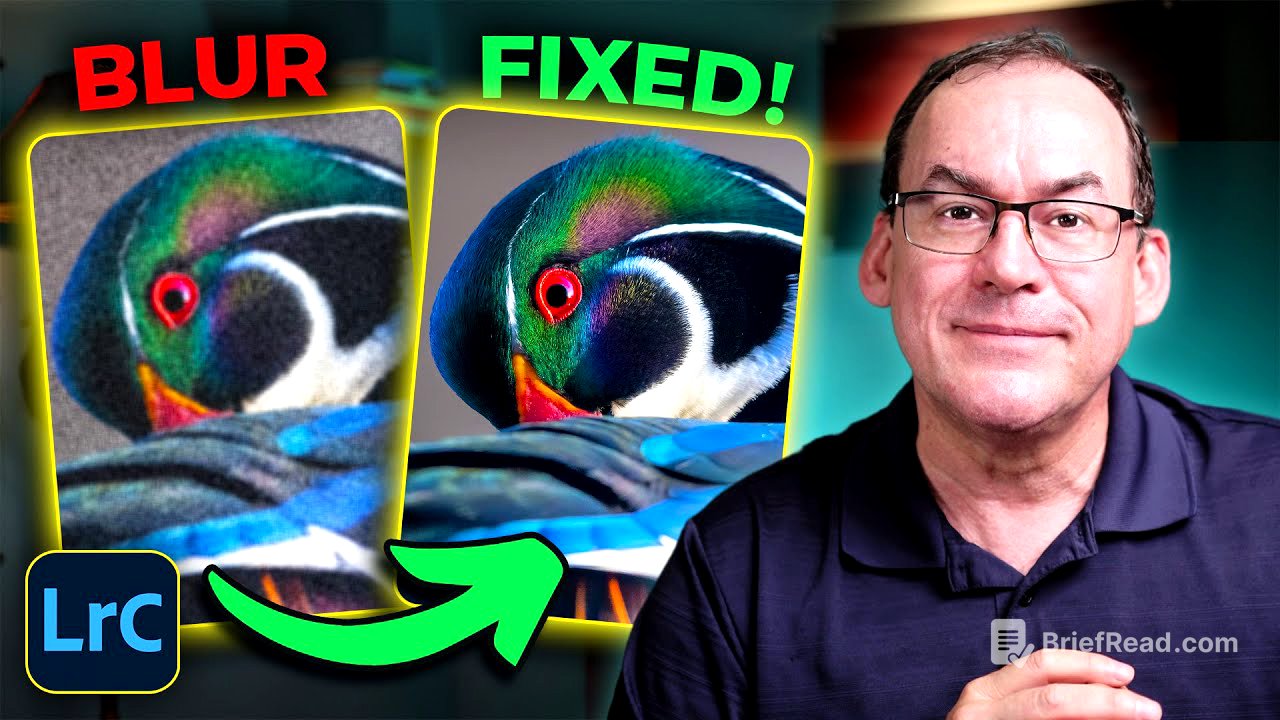
Texture and Clarity Sliders [15:26]
Texture and clarity sliders increase contrast at different scales. Texture works on a smaller scale, affecting fine details without significantly altering the background, while clarity introduces contrast on a broader scale, impacting the entire image. Using a photo of a mallard duck, the author shows how texture can enhance the crispness of the subject without affecting the background, whereas clarity can make background elements more prominent.
Bonus Tip: Subject Masks for Sharpening [17:30]
The author's favorite sharpening tip involves using subject masks in Lightroom to apply sharpening only to the subject, excluding the background. This technique prevents the amplification of noise and unwanted details in the background. By creating a subject mask, users can precisely control the sharpening effect, ensuring the subject is sharp while maintaining a pleasing background.