TLDR;
This tutorial provides a comprehensive guide to creating fluid simulations in Blender, covering everything from basic setup to rendering the final animation. Key points include:
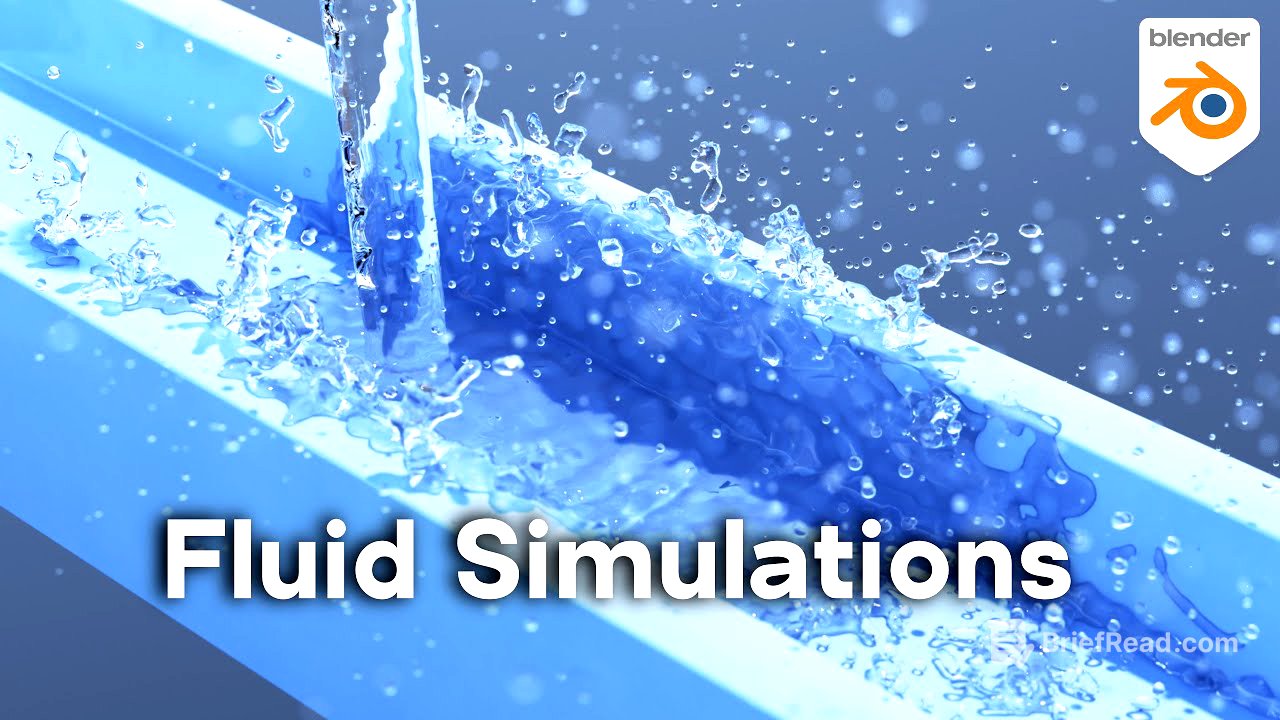
- Modelling a basic scene with a sink and gutter.
- Setting up fluid physics for different objects (domain, flow, effector).
- Adjusting simulation parameters like resolution, viscosity, and gravity.
- Using force fields to control fluid behaviour.
- Animating the camera and adding materials and lighting.
- Rendering the animation and compiling frames in Blender's video editor.
Intro [0:00]
The video introduces a beginner tutorial on creating fluid simulations in Blender, demonstrating the creation of an animation with lighting, rendering, and materials. The tutorial covers the basics of fluid simulations, with timestamps provided in the description for easy navigation. Support for the channel is encouraged through Gumroad, Patreon, YouTube memberships, and the Super Thanks feature.
3d Modeling [1:25]
The process begins with deleting the default scene elements and adding a cube to model a basic sink. The cube's dimensions are adjusted to real-world scale by scaling it down to 0.6 and then scaling the z-axis to 0.3. The tab key is used to enter edit mode, where the top face is inset and extruded downwards to create the sink basin. A gutter object is created by duplicating a face, scaling it to two and a half grids long on the x-axis and half a grid wide on the y-axis, and extruding it upwards. Loop cuts are added and scaled to shape the gutter, directing fluid into the sink. A plane is added and scaled to serve as the ground in the background.
Adding the Fluid Objects [4:23]
An icosphere is added to act as the fluid source, scaled down to 0.08, and positioned above the gutter. A cube is added to serve as the domain for the fluid simulation, sized to encompass the sink, gutter, and icosphere. The domain cube defines the area where the fluid simulation will occur. All objects are selected, and their scales are applied using Ctrl+A to ensure correct simulation behaviour. The Blender file is then saved to preserve the progress.
Adding Fluid Physics [6:22]
Fluid physics are added to the cube, icosphere, and sink objects via the physics properties panel. Each object is assigned a fluid type: the cube as the domain, the icosphere as the flow source, and the sink as the effector. The domain defines the simulation area, the flow object emits fluid, and the effector object interacts with the fluid.
Change Simulation Type [7:50]
The flow type of the icosphere is changed to liquid to emit water instead of smoke. The domain type of the cube is also changed to liquid. The icosphere is scaled up slightly to ensure fluid emission.
Fluid Mesh [8:21]
The mesh option is enabled on the domain object to visualise the fluid as a mesh rather than just particles. This allows the fluid to be seen as a continuous body of water.
Flow Behavior [9:18]
The flow behaviour of the icosphere is changed from geometry to inflow, causing it to act as a faucet and continuously emit water. The geometry setting turns the object's geometry into fluid.
Simulation Quality [10:24]
The resolution divisions of the fluid domain are increased to 70 to improve the simulation quality and prevent the fluid from passing through the sink object. Higher resolution divisions result in a more detailed and accurate simulation but also increase computation time. The resolution divisions are increased to 100 for even better quality.
Baking the Simulation [11:34]
The simulation is baked to improve playback performance. The cache settings are adjusted to specify the location for saving the baked data, and the end frame is set to 200. The bake type is changed to "all," and the "bake all" button is clicked to start the baking process. The Escape key can be used to cancel the bake if needed.
Pin the Bake Button [13:39]
The physics settings are pinned to keep the bake button accessible while working on other objects. The outliner is closed to create more space, and the window is split to create another properties panel. The pin button is clicked to keep the domain object's settings visible, allowing for quick rebaking of the simulation.
Simulation Speed [15:08]
The time scale setting is used to adjust the speed of the simulation. A time scale of 0.3 creates a slow-motion effect, while a time scale of 2 makes the simulation faster. The time scale is set back to 1 for real-time speed.
Objects Interact with Fluid [16:04]
A cube is added to interact with the fluid. The cube is made an effector to make the fluid collide with it. The cube is animated to move through the fluid, pushing it around. The resolution is increased to 120, and the simulation is baked again.
Control Amount of Fluid [18:09]
The amount of fluid is controlled by changing the size of the flow object (icosphere). A larger flow object emits more water, while a smaller one emits less. The "use flow" option is animated to control when the water is emitted from the flow object, creating an on/off faucet effect.
Remove Fluid from Simulation [20:18]
The outflow flow behaviour is demonstrated, which acts like a sponge or drain, removing any fluid that touches it. An icosphere is added and set to outflow, causing water to disappear upon contact.
Simulation Field Weights [21:33]
The field weights settings are explored to control various forces affecting the fluid simulation. These include gravity, force, vortex, and wind. Turning these off prevents the fluid from being affected by them.
Changing the Gravity [22:06]
The gravity field weight is adjusted to change the strength of gravity affecting the fluid. Setting gravity to zero causes the fluid to remain stationary. Reducing gravity simulates moon or Mars gravity. The icosphere is animated to better demonstrate the effect of reduced gravity.
Using Force Fields [23:08]
A force field is added to the scene to influence the fluid's movement. The force field pushes the water away from it. The strength of the force field is adjusted to control its effect on the fluid. The force field's influence can be animated. The wind force field is used to add ripples and noise to the fluid. The vortex force field rotates the fluid and sucks it into the centre.
Fluid Direction (Initial Velocity) [28:21]
The initial velocity settings are used to control the direction of the fluid flow. The X, Y, and Z values are adjusted to shoot the water out in a specific direction, simulating a hose effect. Negative values reverse the direction of the flow.
Fluid Thickness (Viscosity) [30:19]
The viscosity settings are adjusted to change the thickness of the fluid, simulating honey or molasses. Higher viscosity values result in thicker fluids. The viscosity strength is adjusted to achieve different levels of thickness.
Setup the Final Simulation [32:21]
The final scene is set up for the final simulation. Keyframes are deleted from the icosphere, and it is repositioned. The viscosity is turned off, and gravity is set to one. The "use flow" option is animated to control when the fluid is emitted. The resolution divisions are set to 200 for high-quality simulation. The simulation is baked with the new settings.
Setup the Scene for Rendering [35:28]
The fluid is shaded smooth to improve its appearance. A bevel modifier is added to the sink object to create more realistic edges, and it is also shaded smooth. A camera is added, and a basic camera animation is created using auto keying.
Lighting the Scene [38:23]
The render engine is set to Cycles for realistic rendering. The colour management is adjusted to use the filmic view transform with very high contrast. An HDRI from polyhaven.com is added for environment lighting. A sunlight is added to provide additional lighting, with its strength and colour adjusted.
Adding Materials [41:24]
Materials are added to the background, sink, and water objects. The background is set to black. A basic procedural material is created for the sink using a noise texture and colour ramp to add variation to the roughness. The water material is created with full white base colour and full transmission, with the roughness set to zero.
Basic Water Material [43:47]
The index of refraction (IOR) for the water material is set to 1.333, based on the water at 20 degrees Celsius value from the "8 the pixel and poly ior list" website. Light paths are increased to improve the appearance of the water. The sphere object is shaded smooth and given the water material.
Render Settings [46:17]
Motion blur is enabled to make the animation look more realistic. The sampling is set to 100 samples. A single image is rendered to test the settings. A denoise node is added in the compositor to reduce grain in the image.
Video Editing [48:20]
The animation is rendered to frames. A new Blender file is opened, and the video editing workspace is selected. The rendered frames are added as an image sequence. The resolution and frame rate are set to match the rendered animation. Sound effects are added and synced to the animation. The final video is rendered with ffmpeg video encoding, mpeg4 container, H.264 video codec, and AAC audio codec.
Closing [52:51]
The video concludes with a thank you and encouragement to support the channel through Gumroad and Patreon. Links to other simulation tutorials and a Blender beginner fundamentals playlist are provided.